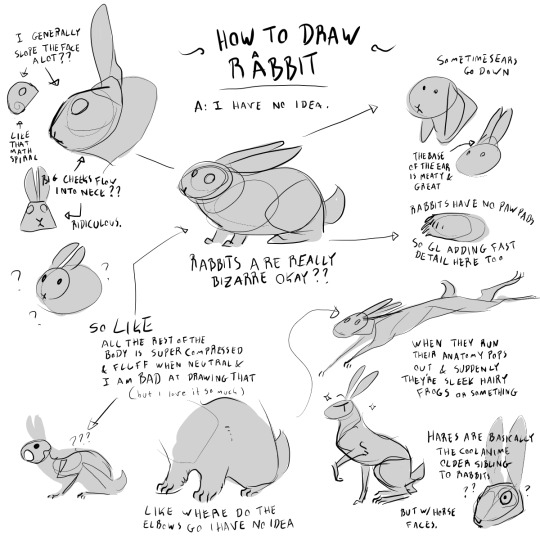
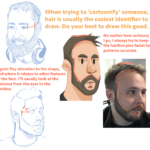
okay this is so late and probably not relevant and also the worst tutorial ever but
I super recommend checking out skinned rabbits if that doesn’t bother you, their musclestructure is beautiful and it helps show exactly how much power is hidden in all that cute fluffiness!
You might be surprised to learn there are a lot of different species of raven and crow! The taxonomic difference between a raven and a crow (that is, whether a species gets named of or the other) is size and lifespan rather than genetic grouping. When comparing the species most of us are most familiar with – the American crow (C. brachyrhyncos) and common raven (C. corax), which will be the two I’m focusing on here – you can’t exactly tell the bird’s age most of the time, so if you have other animals or objects to compare the bird to, size is often the first clue.
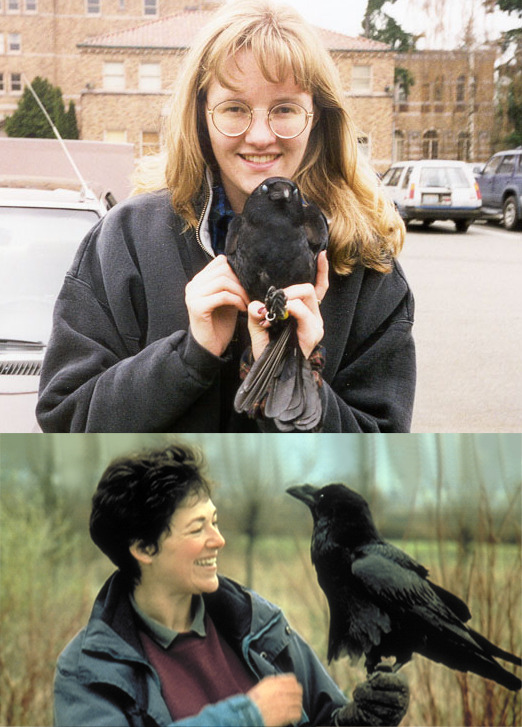
The common raven is is massive for a passerine. It’s the size of a red-tailed a hawk, with a wingspan over four feet. Crows, on the other hand, are typically about the size of an African grey parrot. Compare someone holding a crow vs someone holding a raven:
And lemme tell ya, it’s one thing to READ about how big they are, but it’s another to SEE it.
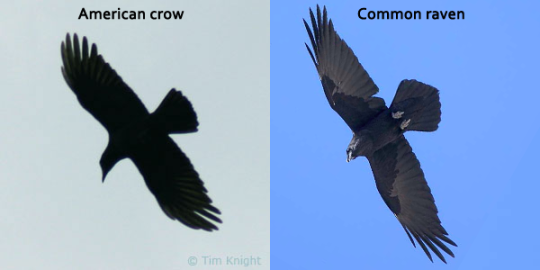
If you see a corvid in flight and can’t get a bead on its proportions, the shape of the tail and flight feathers is another good identifier. A crow’s tail is triangular or fan-shaped, while a raven’s is wedge-shaped (ie the middle tail feathers are longest). Both have well-defined primaries, but a raven’s are much deeper and tend to spread wider. Ravens tend to soar a lot, too; crows are consistent flappers.
Finally, if you can get a good look at the head, the differences are pretty obvious. A raven has a beak that hooks at the end and is as long as its head (or in the case of a Chihuahuan raven, longer than!) while a crow’s beak is straighter, shorter, and lighter-looking in general. Both have nasal bristles, but the shape these bristles form is different due to beak size (a raven’s often looks squared off). Crows are kinda shiny and a bit fluffy; ravens are iridescent and have a very distinctive “beard” of shaggy feathers at their throats which bristles up like hackles when they call.
Finally, their voices are a bit different – a crow’s flat, high caw vs a raven’s deep, resonating kronk – but both species have a very wide range of natural vocalisations and are accomplished mimics. [This video] has some great examples of the caw vs kronk sounds.
So i was thinking “why haven’t I seen any star brushes for sai? bc im too lazy to open up BULKY ol photoshop” and so i made my own! well making the pattern i used this image If people like it i’ll definitely make more!
Download Here if this download link doesn’t work for some reason please let me know!
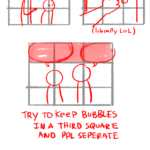
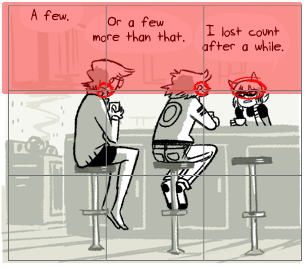
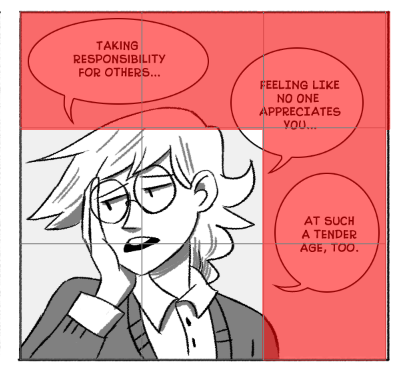
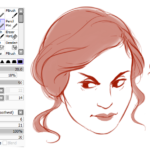
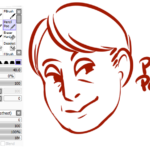
i just want to say, for people reblogging this, that this is called the “rule of thirds” and the tips i wrote here by no means are things that you HAVE to do! these are just tips i use for myself, i kind of made up the bubble rule and i dont even know if im using the rule right haha so there theres that! i just like to use it so i know my bubbles have a place to go
examples of me using rule of thirds to separate elements in “Rachael and Penny”
i got the information a long time ago from a thread on penciljack called Storytelling 101, specifically this image
there is tons of information on rule of thirds available, i know eyecager has a post that dips into it ….
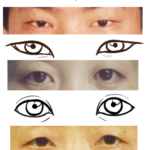
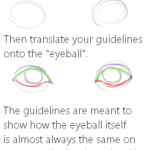
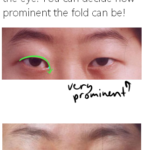
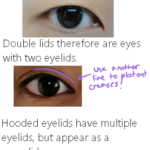
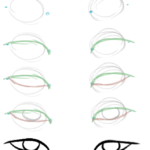
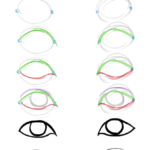
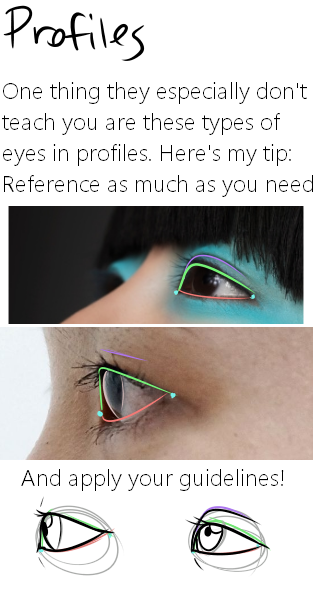
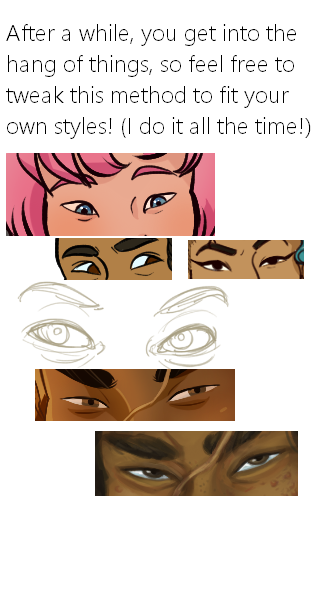
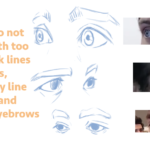
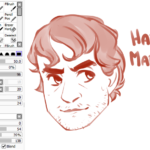
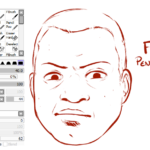
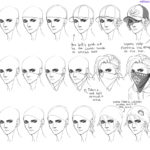
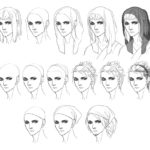
Here it is, my long winded tutorial, complete with some step by step action. I see a lot of people talk about wanting to diversify their artwork but not knowing how. This is my help to you. You really should take the time to invest in learning diverse eye shapes as diverse artwork always makes you a better artist. And frankly I’m really tired of drawing tutorials that talk up character diversity but only have the stereotypical “one Asian eye”.
I did some step by steps for those three diagrams, but I actually got them from this blog which has 14 of those examples! (Bonus: it’s a makeup blog so if you need help with that or want some idea of how to shade these eyes, there ya go)
Quickest way to improvement? Practice. It’s a simple bit of advice that rings with absolute truth. Articles, tips, mentors, and study will never get you as far as rolling up your sleeves and getting down to work, be it animation or any other skill. Today we’ve compiled a list of exercises, like animation push-ups, that will get your art skills buff and toned.
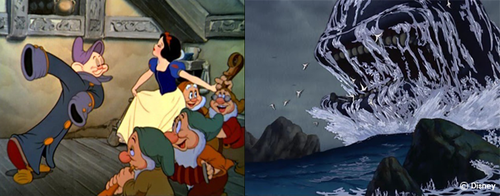
Maybe you still need convinced of how important the “Art of Doing” is? Look no further than the early days of animation, especially at the Disney studio. Here were a group of animators (before being an animator was even a thing) who HAD no books to read, or websites to visit, or even experienced animators to ask. They learned via the age old art of hands-on training, experimenting and discovering as they went. And some would argue they created some of the greatest animation to ever be seen. Masterpieces like the dwarfs dancing in Snow White or the terror of the Monstro scene in Pinocchio. So be like them! Get out there and do animation!
Some of these exercises you may have done or seen before; some maybe not. Consider doing each of them, even if you did once previously, because returning to an old exercise to see how much you’ve progressed is a very valuable experience.
Level 1 Exercises
(Do not discount their simplicity! Here you have the principals of animation, which all other animation is built on. They are worth your time and effort.)
Sleeping character startled by alarm then returning to sleepy state
Opening a cupboard and removing something inside
Putting on a pair of pants
Opening the “world’s best gift” and reacting
Any of the above exercises using a very heavy character/object next to a very light character/object. Enhance the differences the weight change makes!
Things to keep in mind:
Reading these exercises will do as much for you as reading about push-ups would do for your physical muscles: NOTHING. If you want the benefit, you must animate them. Take a deep breath and just do it.
Do not forget the famous words of Ollie Johnston: “You’re not supposed to animate drawings [3D models]. You’re supposed to animate feelings.” If a character isn’t thinking, they aren’t alive, and the animation has failed.
Keep it simple! There is no reason to over complicate any of these exercises. Going back to push-ups, would push-ups be harder if while doing them you also recited the Gettysburg Address? Yes. Would they be any more beneficial? No. Keep things nice and simple and clear.
Do your best. There is no reason to do these exercises poorly. Give it your all. You don’t have to show anyone, these are for you. You owe it to yourself to try your very best. Something not quite right? Take the time to fix it.
As always, have fun. Push ups are not fun. Animation is supposed to be. Be joyful in your work!
Have any questions about the exercises above? Leave a comment below and we’ll answer them the best we can! Someone else may be wondering the exact same thing, so you’ll help them too. Likewise if someone is looking for possible exercises, why not share a link to these and give them a hand?
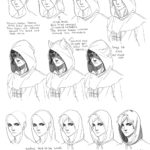
No more melted tomblerones or mising skulls, yyeann!
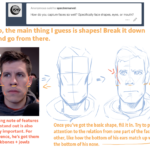
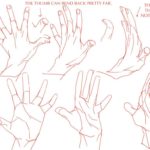
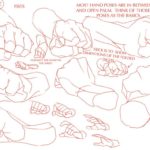
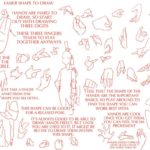
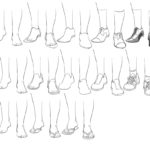
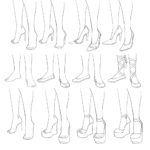
This is my basic process for pretty much everything I draw. The key is understanding the shape of the garment you’re trying to draw and the shape of the body part you’re putting it on.
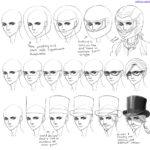
Drawing the body first forces you to make the shoe, hat, or clothes fit that body. With practice you’ll be able to skip some steps. This method works the same no matter the perspective or pose. It just relies on your knowledge of what a hat looks like from above, or what the bottom of a shoe looks like. When in doubt, just google refs. Don’t necessarily need the exact angle you’re trying to draw. Look at different pics to give you an idea of how it works in 3d.
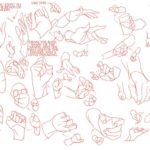
Shoes are always a bit tricky because feet are a stupid ass shape.
It might help if you think of hats as a cylinder fitted to the person’s head to help you get the perspective right before you push in detail. note: heads aren’t circles. they’re kind of egg shaped if you look at them from the top.